Proper painting preparation is the key to creating a great finished product. In fact, proper preparation generally takes about half the total project time and, in some cases, can take as much as 70% of total project time. If you find yourself unhappy with your painter’s final product, it likely has to do with the initial painting preparation work.
Painting Preparation to Protect Non-Painted Surfaces
- Remove all wall hangings and move any furniture out of the room or into the center of the room. While you might choose to do this yourself, it is not uncommon for painters to move larger furniture for you. We always recommend customers move high value items and electronics themselves.
- Cover furniture and non-painted surfaces with drop clothes or plastic sheeting. We prefer to tape down plastic sheeting in many situations, but either will suffice. If there are any wall fixtures not being removed for painting, it is important to cover them with plastic and use painters tape to properly mask the area.
- Cover floors with plastic floor coverings. We prefer plastic floor coverings rather than paper floor coverings. While it is a little more expensive, the improved durability safeguards against damage from foot traffic, painting equipment and spilled paint. With all the foot traffic that happens as your paint crew brings their equipment in and out of your house, you don’t them covering your floors with thin paper that is prone to ripping.
- Remove all wall plates and switch covers. While some customers may want these surfaces painted, it is best to remove them first and paint them separately. In addition to making it easier to paint the wall, you will have a fully covered surface in the event you want to change your covers one day.
Prepare Surfaces to be Painted
- Fill any holes from wall hangings or other damage to the surface. You painter will also need to sand these areas afterwards to make sure the surface is smooth. If you plan to use the same picture hangers or anchors and don’t want them filled, circle these areas or point them out
 to your painter ahead of time.
 - Remove peeling paint and scuff sand any wood or trim. This step allows for proper paint adhesion and a smooth final product. For homes built before 1978, we follow the necessary lead-based paint precautions. You can read more about lead-based paint in our blog post: Lead Based Paint: What You Need to Know.
- Clean the surface. You may not realize it, but walls and trim collect dust and dirt. If you paint these surfaces before cleaning them, dust and dirt will mix with your new paint and you won’t have the clean, new look you want.
- Allow surface to dry before painting. As you can imagine, paint will not adhere well to a wet surface.
- Prime any new drywall or new wood with the appropriate primer. If you have a stained wood, we typically use an oil based primer as that offers the best protection against the previous stain bleeding through. It is also important to use an oil based primer for water marks or other stains on a ceiling. For any significant color change, most paints include primer, but your painter might also want to prime the walls first.
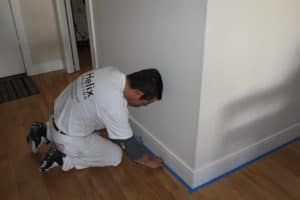
- Use caulking to seal joints and gaps where walls meet baseboards, counter-tops, windows and doors. Filling these gaps is a key step in creating a properly prepared surface. Without this step, the finished product will not look like the new space you want.
To learn more about Helix Painting and the great results we produce, visit our website.